TL;DR

Turn quiet afternoons into listening time
- Thousands of audiobooks, podcasts and originals
- Listen on your phone, tablet or Echo — also offline
- Cancel anytime
Winter sowing is a straightforward, cost-effective way to start hardy seeds outdoors during winter. It uses natural cold and sunlight to stratify and germinate seeds, reducing indoor effort and extending your planting season.
Imagine planting seeds in the middle of winter—without a heat mat or grow lights—and watching them sprout in early spring. It sounds wild, but winter sowing makes this possible. This method turns the coldest months into your secret weapon for starting plants with minimal effort. If you love the idea of working smarter, not harder, in your garden, stick around. You’ll learn how this simple technique can save you time, money, and stress while giving your garden a head start.
Whether you’re a seasoned gardener or just starting out, winter sowing fits right into a cozy, country-living rhythm. Think of it as your outdoor nursery—where nature does most of the work. Ready to see how you can turn those empty milk jugs into green miracles? Let’s get started.
Choose hardy seeds suited for outdoor cold stratification, like poppies, delphiniums, and native wildflowers.
Use recycled containers with drainage for easy, eco-friendly setups, and prepare them properly before sowing.
Plant in late winter or early spring—timing depends on your climate and chosen plants.
Monitor moisture carefully—soil should be moist but not waterlogged, and open containers on sunny days to prevent mold.
Enjoy early blooms and stronger plants—winter sowing mimics natural cycles, giving your garden a head start.
What Is Winter Sowing — And Why It’s Perfect for Easy Gardening
Winter sowing is a method of planting seeds outside in containers during winter, letting nature do the hard work of stratifying and germinating your plants. It’s especially great for hardy annuals, perennials, and some vegetables that need cold to sprout. The significance of this approach lies in its ability to harness natural cold cycles, which are essential for breaking seed dormancy in many species. When seeds experience the proper cold period, they develop stronger, more resilient roots and stems, leading to healthier plants once transplanted. This process reduces the need for artificial stratification in controlled environments, which can be time-consuming and resource-intensive. Additionally, because seeds are exposed to natural conditions, they tend to develop a better adaptation to your local climate, improving their chances of survival and growth. The tradeoff, however, is that germination timing can be less predictable, and some seeds may not sprout if the weather doesn’t cooperate. But overall, this method offers a sustainable, cost-effective, and low-maintenance alternative that aligns with natural rhythms, making gardening accessible and less stressful.
This approach eliminates the fuss of indoor seed-starting setups—no grow lights, no heating mats, just outdoor containers and a bit of patience. Plus, it’s gentle on your wallet. Instead of buying expensive seed-starting trays or running electric heaters, you recycle milk jugs or trays, making it a sustainable choice too.
Imagine the satisfaction of planting your favorite flowers in winter and seeing their green shoots in early spring. That’s the magic of winter sowing — it’s simple, natural, and surprisingly effective.
recycled plastic milk jug seed starter
As an affiliate, we earn on qualifying purchases.
As an affiliate, we earn on qualifying purchases.
How Winter Sowing Works — The Simple Step-by-Step
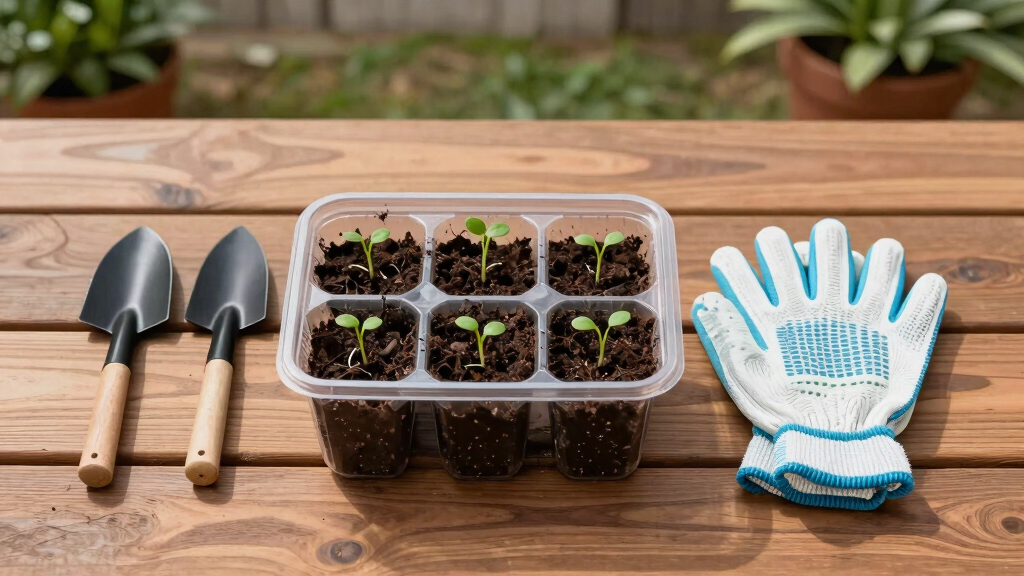
- Select your containers: Clear plastic milk jugs, soda bottles, or trays with drainage holes work great. Recycled materials are eco-friendly and easy to find.
- Prepare the containers: Cut the tops off milk jugs or poke holes in trays to ensure drainage. Clean them well to avoid mold. Proper preparation is crucial because it ensures your seedlings won’t drown in excess water or suffer from mold growth, which can hinder germination. Making drainage holes allows excess moisture to escape, preventing root rot and fungal issues. Cleaning the containers reduces the risk of disease transmission, especially if reusing old items. This step might seem simple, but neglecting it can lead to rotting seeds or mold that can wipe out your efforts. The tradeoff here is that poorly prepared containers can create a damp, unhealthy environment, so taking the time to prepare them properly is worth the effort for a successful start.
- Sow your seeds: Fill with soil or potting mix, follow seed packet instructions, and plant your seeds at the recommended depth. Proper sowing depth is key—planting too shallow or too deep can delay germination or prevent it altogether. Using quality soil helps retain moisture and provides essential nutrients. Remember, each seed type has its own needs; some require surface sowing, while others need to be buried deeper. Paying attention to these details ensures better germination rates and healthier seedlings, which will be more resilient once transplanted.
- Seal and place outside: Cover the containers loosely, then set them in a sunny spot outside. The containers act like mini-greenhouses, trapping warmth and moisture. This microenvironment is vital for maintaining the right temperature and humidity levels, mimicking natural conditions that encourage germination. The loose cover allows excess moisture and gases to escape while keeping enough warmth in to stimulate growth. Choosing a sunny location ensures the containers get enough light, which is essential for seedling development. If placed in a shaded or windy area, seedlings may struggle or dry out, reducing success.
- Monitor and open on sunny days: During warm spells, open the containers to prevent mold and allow fresh air. Keep an eye on watering—moisture is key but not soaked. Consistent moisture is critical because it signals to the seed that conditions are right for sprouting. However, overwatering can drown the seeds or promote mold, so balancing moisture is essential. Opening the containers on warm, sunny days prevents excess humidity build-up, which can cause mold and damping-off disease. This step requires attentiveness but pays off by maintaining a healthy environment for your seedlings to thrive.
- Watch for sprouting: As temperatures climb, seeds will start to poke through. Once seedlings are strong enough, transplant them into your garden. Early germination means you get a head start on the growing season, often resulting in larger, more vigorous plants. Transplanting at the right time—when seedlings have several true leaves and sturdy stems—ensures they can handle outdoor conditions. This natural process, when done correctly, enhances plant resilience and reduces transplant shock, leading to a more successful garden overall.
For example, a gardener in Vermont can start seeds in December, then have lush seedlings ready by early April, all without indoor grow lights or heat mats.
As an affiliate, we earn on qualifying purchases.
Container Choices — Which Recycled Homes Work Best?
| Container Type | Advantages | Best For |
|---|---|---|
| Milk jugs | Clear, large, easy to cut, insulates well | Large seeds like pumpkins, tomatoes |
| Soda bottles | Flexible, lightweight, transparent | Herbs, small flowers |
| Trays with drainage | Multiple seedlings, easy to monitor | Perennials, native wildflowers |
Recycled containers save money and help the planet. Just make sure they drain well and are clean before sowing. Proper container choice can make or break your winter sowing success. For instance, using milk jugs provides excellent insulation, keeping roots warmer during cold snaps, but they might be bulky to handle. Trays with drainage are great for sowing multiple types of seeds and allow for better airflow, reducing mold risk. The tradeoff is that some containers, like soda bottles, may not insulate as well and could heat up too quickly in direct sun, potentially stressing seedlings. The key is to match your container choice to your climate and the plants you’re growing, ensuring optimal conditions for germination and growth.
As an affiliate, we earn on qualifying purchases.
Best Plants to Start with — Easy, Hardy Choices for Beginners
Not all seeds love the outdoors in winter. Stick to hardy plants that naturally require cold to sprout. Think of these as your gardening training wheels. Some of the easiest to start include:
- Poppies — Bright, cheerful, and self-seeding, they thrive in cold soil. Their ability to self-sow means you get new flowers year after year with minimal effort, making them ideal for beginners.
- Delphiniums — Classic garden perennials that need a cold spell to bloom. Proper stratification during winter ensures they develop strong roots and vibrant flowers, which enhances their resilience in the garden.
- Native wildflowers — Perfect for natural landscapes and wildlife gardens. They often have evolved to require cold stratification, so starting them outdoors in winter helps mimic their natural germination cues, leading to more successful establishment.
- Herbs like thyme and chives — Hardy and versatile, they come up reliably in spring. Starting these early outdoors allows them to establish a strong root system, resulting in a more productive herb garden later on.
For example, planting wildflower seeds in January in Maine often results in a colorful meadow by late spring, with minimal fuss. The key is selecting plants adapted to your climate and understanding their germination needs, which can greatly improve your success rate and enjoyment.
As an affiliate, we earn on qualifying purchases.
How to Avoid Common Winter Sowing Pitfalls
Winter sowing is simple, but a few mistakes can trip you up. The biggest is overwatering—waterlogged soil invites mold and rot. Proper moisture levels are critical because excess water can drown seeds and promote fungal growth. Another common issue is using containers without drainage, which traps excess moisture and creates a soggy environment that hampers germination. Neglecting these details can lead to mold, damping-off disease, or seed rot, wasting your effort and seeds. To keep things healthy:
- Always punch drainage holes in your containers to ensure excess water can escape.
- Check soil moisture regularly—soil should be moist but not soaked, as overly wet conditions promote mold and root rot.
- Open containers on sunny days to allow excess humidity and prevent mold buildup, which can be particularly problematic in enclosed environments.
- Label your containers clearly to keep track of different seeds and avoid confusion, especially if planting multiple varieties.
For example, one gardener in Oregon kept mold at bay by opening her jugs on warm days and making sure the soil didn’t stay wet. Observing your setup daily and adjusting watering and ventilation accordingly is essential for success. Remember, patience and attention to detail are your best tools to prevent common problems and grow healthy seedlings.
What You’ll Gain — The Surprising Benefits of Winter Sowing
Beyond the low effort, winter sowing offers several unexpected perks. First, it extends your planting season—seeds start sprouting as early as March, giving you a jump on spring and allowing for earlier blooms and harvests. Second, it’s more economical—no need for indoor grow lights, heating mats, or additional heating devices, which saves on energy costs and reduces your environmental impact. Third, it’s eco-friendly. Reusing containers and relying on natural cycles reduces waste and energy use, aligning your gardening with sustainable practices. Lastly, it’s a gentle way to grow—seedlings develop in tune with nature’s rhythms, often resulting in stronger, more resilient plants that are better adapted to local conditions. This natural development process can lead to healthier plants with fewer transplant shocks and better overall performance.
Imagine the satisfaction of seeing your garden burst into color earlier than usual, all while saving time, effort, and money. Embracing this simple method not only benefits your garden but also nurtures a deeper connection to the cycles of nature, making gardening more rewarding and less stressful.
Frequently Asked Questions
Can I do winter sowing in a mild climate?
Absolutely. In milder zones, you might start earlier or use containers with better insulation. The key is to choose hardy plants and monitor moisture carefully, since extreme cold isn’t a concern here.
Do I need to bring containers inside during extreme cold?
Generally, no. The idea is to let nature do the stratification outdoors. However, if your winter is unusually severe, a temporary indoor spot or a sheltered area can protect your seedlings without disrupting the process.
Is winter sowing suitable for vegetable seeds?
Yes, but stick to hardy vegetables like kale, broccoli, or herbs like thyme. Tender plants generally won’t survive the outdoor cold in winter sowing containers.
How do I know when my seedlings are ready to transplant?
Look for strong, healthy growth with several leaves. Usually, seedlings are ready when they’re about twice the size of a quarter and have sturdy stems—around 6-8 weeks after sprouting, depending on the plant.
What if mold appears on my seeds or soil?
Mold is common but manageable. Improve airflow by opening containers on warm days, avoid overwatering, and keep containers clean. If mold persists, carefully remove affected seedlings and adjust watering habits.
Conclusion
Winter sowing is a quiet revolution for the gardener who prefers natural simplicity. It turns the cold months into fertile ground for future blooms, with minimal fuss. Remember, the best garden is one that works with nature, not against it. So grab those recycled containers, plant your hardy seeds, and let the winter winds do their magic.
In the end, this method isn’t just about growing plants—it’s about reconnecting with the gentle rhythm of the seasons. A cozy, thriving garden is just a few simple steps away.
Halloween Picks
halloween
As an affiliate, we earn on qualifying purchases.